⚠️ Installing the Instant Checkout module should be first performed on a sandbox
environment before enabling Instant in your live production storefront.
Our team is available to complete this process for you if we have been provided with credentials. Please email help@instant.one for more information.
Access
Instant requires to access set up the checkout component. Please make sure you have allowed access to the following:
Access to modify Instant Checkout configuration under Stores > Configuration
Access to Settings > Integrations
Access to Orders (for test orders)
Access to System > Cache Management & Index Management
Installing the Instant extension
- To begin, ensure you have installed the Instant Checkout extension via composer by running the following command in the main directory of your Magento project composer require instant/instant-checkout. For more information on Composer, see the website: https://getcomposer.org/.
- If composer is unavailable, you can install the extension manually by downloading the files from the repository here: https://github.com/InstantCheckout/instant-magento2 and then placing the files in the app/code/Instant/Checkout directory.
- Once installed, run the following command to enable the plugin: bin/magento module:enable Instant_Checkout.
- Finally run Magento’s setup command: php bin/magento setup:upgrade.
- Check that the extension has installed successfully by going to Stores → Configuration. The Instant extension should be listed as per the image below.

You can also confirm this by going to System > Integrations. Instant again should be listed with the status "Active" as per the image.
Activation
For your store to be able to communicate with Instant, you will need to activate your plugin installation. Fortunately, much like our checkout, this is a one-click experience.
- Log into your Magento store.
- Visit the Stores → Configuration link:
- From the left hand menu on this page select Instant → App Configuration.
(If you do not see this, it likely means the plugin is not installed correctly - Please repeat the steps for Installing the Instant Extension above):
- From the left hand menu on this page select Instant → App Configuration.
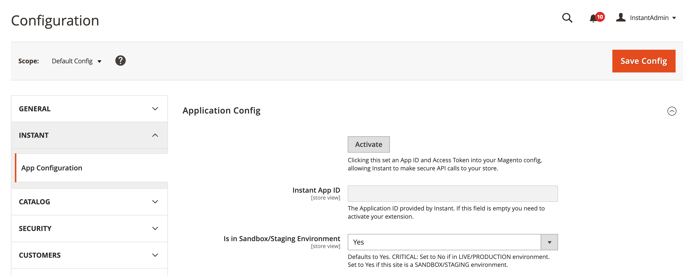
- You should see the following page. Here you see an Activate button, and an Instant App ID field, which should be empty.
If you are on a staging/testing environment, you will want to make sure you have selected Yes, under the Is Staging Environment dropdown box.
Once you have selected the environment click the "Activate" button, and wait for your extension to activate (this should only take a few seconds).
.png?width=688&height=270&name=Untitled%20(1).png)
6. Select where you would like the Instant Checkout button to be visible:

7. Head to your staging site and the
Troubleshooting
Testing
Once you can see the Instant checkout button, you can test by placing an order on your staging site.
- Add an item to your cart and click Instant Checkout
- You should now see the Instant checkout window displayed.
- Enter your email address to log in or create a new account.
- We recommend using a fake card number such as:
Card number: 4242 4242 4242 4242 Date: 24/42 CVC: 424 - Once you have filled out you details, select "Buy Now". This will place a mock order to your staging site.
- Check your order has been processed by visiting your Magento orders page. Help: My order is not showing in Magento

Customisation
For our guide on how to personalise the styling of the Instant Checkout button please head to: https://help.instant.one/customise-the-instant-checkout-button
Instant Dashboard
Please email help@instant.one if you do not have access to you Instant seller dashboard
Troubleshooting
If you encounter an error upon clicking the Activate button, follow these steps to troubleshoot and diagnose the problem:
After I click the Activate button, I get an error.

- Double-check check the extension is installed correctly.
- In the left-hand side menu select System > Integrations. You should see the list of all Integrations. Make sure Instant Checkout has the status "Active".(If not, please follow this guide above to Install the Instant Checkout Extension)
- Check the console for error messages.
- Open your developer tools by right-clicking and selecting "Inspect."
- Within the developer tools, navigate to the console tab and check for any error messages.

- Errors
Instant Domain Blocked
 Problem:The error was related to Instant's domain not being whitelisted in the merchant's CSP directive
Solution: The merchant needs to:
Add *.instant.one and api.instant.one to their CSP whitelist.
HTTP Authentication:
Problem: Instant communicates via API meaning we cannot authenticate via API as well as provide HTTP authentication
Solution: If you have HTTP Authentication for your staging site please deactivate it temporarily for integration.
Testing Errors
I have placed an order but I cant see it in Magento
- Go to System > Cache Management and flush the cache
- Go to System > Index Management and .... ADD
- Refresh your browser and hc
If you encounter any issues while installing or activating, please see our troubleshooting link guide link, or don’t hesitate to get in touch with our team at help@instant.one!
⚡️ Before Instant can be used on production or a live store you must be setup to receive payments. If you aren't already setup please see our guide Getting setup for payments with Instant